Sunday, July 31, 2011

Ice Cream: Garden Mint Chocolate Oreo


Ice cream is one of my greatest loves. I am definitely not an ice cream snob as I found out this past week in Rome when I experienced gelato - rated the "best gelato in Rome" by some. It was in fact delicious (stay tuned for our attempts to recreate the fantastic pistachio and hazelnut flavors), but give me a tub of Edy's and I'll be perfectly pleased. In any case, I love ice cream but unfortunately we have very few if any options for decent ice cream here in Israel. So you can imagine how excited I was when my sister and brother-in-law got me an ice cream maker for a birthday present! They are way ahead of us in their ice cream inventions, having had their ice cream maker for a few months already, so when I heard about their latest experiment I asked my sister to share her recipe. Enjoy!

I found some recipes online for mint chocolate chip ice cream using real mint that looked really good, most notably this one. David Lebovitz is the ice cream man, so I figured it would be pretty good, but I didn’t want to use eggs. Eggs make the recipe more complicated and expensive. But I did want it to be super-creamy. I decided to make the custard with cornstarch instead of eggs, and made a few other alterations. Here’s the recipe I used:

125 grams mint, with stems

1 1/3 cups sugar

500 ml 10% cream

1 cup 1% milk

Dash of salt

250 ml 32% cream

4 Tablespoons cornstarch

Oreo cookies

1 bar of chocolate

1-2 tsp peppermint extract

I bought a bundle of mint from the grocery store pulled off all the leaves (I weighed it with stalks it was 125 grams) and combined that with 1 1/3 cups of sugar approximately, dash of salt, 500 ml of 10% cooking cream, and 1 cup of 1% milk. I cooked that until it was steaming but not boiling and then let it sit in the fridge for a few hours. There was a significant differences between how minty and green it was after the first hour and how minty and green it was after the second, so I would say leave it in for even longer if you want it to be even more minty and even more green.


When you think it’s minty and green enough, strain the leaves out. You have to really press and squeeze the leaves to get the minty-ness out of them. Discard the leaves and reheat your minty milk on the stove.


In the meantime, combine the 32% cream with the 4 tablespoons of cornstarch and whisk so that there are no lumps. After the mint mixture is hot (steaming, but not boiling) add in your cornstarch mixture.


Bring it to a boil and wait until it thickens while stirring. It should coat the back of the spoon/be the consistency you would expect hot pudding to be. When it’s done put it in the fridge to cool overnight and then process according to your ice cream makers instructions!


That’s the basic recipe for the mint ice cream. Also don’t forget to cover the custard mixture with saran wrap pressed into it while it’s cooling. I did and it formed a skin, but it was no harm done anyway. I think you could probably make it with more milk, less cream, or lower fat creams too -- this was just kind of what I had in the house.


I couldn’t decide whether I wanted mint cookies and cream or mint chocolate chip. So in the end I decided that I should just have both. I melted a bar of chocolate in the microwave and added a few teaspoons of peppermint extract to it.


My original plan was to dip the oreos in the mixture, but once I added the extract it got all grainy (probably something to do with the emulsion blah, blah, but whatever that’s Yoni’s department), so instead I just spread the chocolate over the oreos. I put them on a plate covered in tin foil, covered them in plastic wrap and stuck them in the freezer.


The next morning when the ice cream was churning I took them out and put them in the food processor. I pulsed them a couple of times to break them up some and then dumped it into the ice cream mixture towards the end. So good! The mint has an herb-like natural taste and the peppermint chocolate oreos are amazing. In theory you could also make this ice cream using regular old peppermint extract instead of mint leaves and it would taste more like store bought mint ice cream.


This sounds crazier than it is. It's really not that complicated. And it tastes so good.


--SNH

Sunday, July 17, 2011

Veggie Quiche (+Homemade Crust!)


What to make for dinner is often the most challenging the night before you are planning to go grocery shopping. Since grocery shopping has been a bit of a challenge in our new location, we came up with this elaborate (or not so elaborate but full of well meaning efforts) plan to come up with a whole two weeks of menus (breakfast, lunch, dinner) and basically only go shopping once every two weeks. I can discuss menu suggestions and the challenges of this plan another time.... Like I said though, the day before a groceries trip, the fridge (and shelves) are extremely bare and lacking in dinner options. We can, of course, just have pasta and tomato sauce (or ragu perhaps?) because we seem to always have those in stock. But eh, that's not so exciting. Plus, it's hot. And pasta = heaviness.

So what are my options? I have:

two green peppers,
several tomatoes,
eggs,
onions,
and milk.

Put it all together and we have a quiche! And to make this veggie (and cheese-less) quiche more delicious, I made my own flaky pie crust. Admittedly we need to replenish our stock of food supplies but no one will be complaining about dinner tonight!

The recipe for the crust came from Food.com. (Although I did pre-bake my crust for 10-15 minutes at 200C/400F.) The recipe for the quiche came more or less from myself so here goes:

Saute the vegetables (leave the tomatoes out) with a bit of olive oil. While the vegetables are going, mix together 4 eggs, 1 cup of milk and salt and pepper to taste. When the vegetables are finished, pour them into your crust. Then pour the egg mixture over the vegetables. Slice the tomatoes into thin rounds and place on top. Bake at 190C/375F for 30-45 minutes or until the quiche is set.

Thursday, July 14, 2011

Sorbet Series: Sour Green Apple


After our successful results with melon, Rachel and I flung open the fridge and pondered which ingredients we could sorbetize this week (dear Blogger spellcheck: sorbetize is obviously a real word; please stop putting rude red lines underneath it).

Although Israel's formal period of austerity may be decades behind us, a glance inside our fridge during a typical weekday suggests that this young couple is bringing it back in style. Our produce stash consisted of some tomatoes and cucumbers, a bit of spinach, and apples. Apples it is!

We had a combination of tart Granny Smiths as well as those sweet green apples they only have in Israel, and are otherwise known as the Best Apples Ever (unless you are Rachel and prefer Granny Smiths). This was not a problem; in fact, blending tart and sweet proved to be the defining characteristic of this sorbet.

We also had half a bottle of sweet dessert wine brought to us by a guest last week, which was perfect. Not only would the sweet white wine complement the apples, but the alcohol would help by a) keeping ice crystal growth in check, thus giving us a smoother product and b) making our sorbet alcoholic.

As I'm sure you remember from the last sorbet post, we don't have an ice cream maker and so our technique consists of freezing chunks of fruit, then blending them in the food processor along with simple syrup. Thus we were faced with our first challenge, for apple chunks tend to brown pretty fast. The solution is science. I will spare you the lecture on polyphenol oxidation pathways, though, and just say that you can keep sliced apple from turning brown by using something acidic like lemon juice. Common household knowledge.

But why use lemon juice when you have... citric acid? Citric acid is a popular pantry item in Israel, mostly because it's very effective at removing the white chalky calcium deposits that foul up one's קומקום thanks to Israel's very hard water. Why? Because it's an acid! Haven't you been paying attention?

Citric acid has another use, however, and that is giving sour taste to things like sour candies. We don't do a lot of candy making, but it struck me that by coating our apple chunks in a citric acid solution, we could both keep them from browning and make them nicely sour. I didn't measure, but I'd estimate I used maybe a teaspoon of citric acid in a 1/4 cup of water. You can sort of just mix the solution until its sour enough, but not too sour. Then we put it in a ziplock back and Rachel tossed in the apple pieces as she cut them. And then we froze it.

There was a second challenge. Most online recipes seem to indicate that simply freezing apples and blending them would make a less-than-smooth sorbet. They generally recommended cooking the apple first. This is because cooking helps release pectin from the apple, and pectin makes the sorbet smoother. But this also makes the sorbet brown.

Instead, we turned to an ingredient that is relatively obscure, but most definitely a rising star in the culinary world. I give you: xanthan gum. Xanthan gum has been used in the food industry for ages, but only recently has it started appearing on more mainstream shelves. Why? Because it's indispensable for people doing gluten-free baking, and that market has been definitely growing lately.

But that only explains why it's easier to get. What does it do? Again, I'll spare you the lecture and boil it down to this: everything. If you have a texture issue, xanthan gum will solve it 9 times out of 10. I know I'm being a little silly and unscientific, but trust me when I say that one container of xanthan gum in your pantry will a) allow you to change the way you make tens, if not hundreds of dishes and b) last you forever, since you usually only need to add it in fractions of a teaspoon.

Also - I know xanthan gum starts with an "x", but don't be afraid. It's made from plant stuff. I would even call it "natural", but the distinction between natural and synthetic when it comes to food is kind of a pet peeve, and I'd rather not get into it. The bottom line is that xanthan gum is safe, and expect to see and hear about it more in the future. You heard it here first.

Fortunately for us, there's a natural food store just a short walk from the Technion gate, and they carry xanthan gum. A container set us back some 40 shek, but, like I said before, this stuff lasts a long time.

With all the necessary ingredients, we got to work. The apple chunks were easier to grind, but they needed more liquid to come together than did the melon, so it's a good thing we had wine in addition to our syrup. And the xanthan gum was key. Before it, our sorbet was good but slushy. With it, it became smoother, like icy applesauce. We started with 7 apples, which took 3 shifts in the food processor. Each time I added about 1/4 of a teaspoon of xanthan gum. For a final touch, I shook in a little more citric acid to give the sorbet a tart kick in the pants.

The result? I think this sorbet is phenomenal, and our best (of two, ok) yet. Rachel preferred the melon, mostly because she likes melon better than apple.

Anyway, time for me to get back to studying for my last final. Among other things, it covers xanthan gum!


Honey Whole Wheat Challah


In the spirit of experimentation I tried a new challah recipe this week. Last time I baked challah I was informed that I could just use the mixer to knead the dough instead of doing it with my hands. Thinking that this would make my life so much easier, I began the recipe with high hopes.

After kneading the dough for awhile with the machine, the dough was still very sticky and appeared unaffected by the efforts. I assumed the dough would clump up around the dough hook and basically pull away from the edge of the bowl. It didn't do this and so I kept adding flour in the hopes that it would. After awhile, about 15 minutes or so and at least a few extra cups of flour, I decided the dough (and I) had had enough. I managed to get it out of the bowl and into a clean and oiled bowl for rising. Turns out it was OK and the kneading seemingly worked but in the process I had become a bit frustrated. I used about a kilo of flour in total. What was I doing wrong?

I discussed this with my husband, the food scientist. He explained that measuring flour in cups is highly inaccurate (since you could fill up a cup of flour, press it down firmly and then add a lot more) and a better, more accurate, way to measure out flour is by weight (in grams). In the future I'll look for a recipe that measures out the flour in grams, which works out well for me since I love using our food scale. (It appeals to my detail oriented and exacting nature.)

Here is the recipe I used. A couple modifications; I used instant yeast so I didn't have to bother letting it stand for 10 minutes. I also used 1/2 cup of honey (date honey) instead of 1/3 cup - to emphasize the sweetness a bit more. Lastly, I tried a four strand braid - watch this video tutorial for instructions.

Lesson learned: measure your flour by weight. Questions: How easy is it to come up with your own bread/challah recipe? Is this one of those things that takes a lot of trial and error that I won't have the patience for? Maybe I should let others pave the way and just benefit from their hard work. Or I can let the food scientist in the house figure it out for me....

Chocolate Fudge Cookies

An attempt to find the perfect chocolate fudge cookie...

If I was in the U.S. I would probably have just bought a brownie mix and made cookies with it instead. Since I am mix-less and on my own here, I'll have to make do with what I have. I used this recipe. As usual I made some modifications. Instead of yogurt I used a chocolate pudding mix (made with soy milk). I also had to find a brown sugar substitute since I was running low. My substitute worked like this - for every 1 cup of brown sugar the recipe calls for, I substituted 1 cup white sugar plus 1 1/2 tablespoons honey. You could probably just substitute 1:1 with white sugar alone. What difference does it make? I did consult with a food scientist but the answer didn't sink in. A quick internet search revealed exactly what I was looking for: "Are Brown and White Sugar Interchangeable when Baking?"

A little trick to get the "cracked" look with the cookies - place the dough onto the cookie sheet as balls (somewhere between a teaspoon and a tablespoon each) and bake for 5-7 minutes. A few minutes before they're done - take them out and using a spoon, press each one down a bit. You'll notice the cracking right away. If it doesn't work exactly, leave them in for a bit longer and then press down.

All in all the cookies were delicious - very chocolatey (thank you chocolate pudding). As always there's room to grow.... With this recipe I would say my issue is the amount of sugar. Next time I'll either repeat the recipe and cut down on the sugar or try a different one.

Tuesday, July 12, 2011

Snack: Roasted Chickpeas

When I think about chickpeas I realize that my attitude towards these legumes has evolved over the years. I was probably first introduced to chickpeas as an addition to boring green lettuce salads (I love those boring salads but for the sake of the chickpea let's hear me out). In high school eating chickpeas out of the can was "cool" when you were trying to eat healthy. It was in college that I first began to appreciate this wonderful legume. I "invented" this great salad that included chickpeas and corn. Skip ahead to the current day when we live in the Middle East, the home of the falafel. I have to admit that I never really liked nor appreciated falafel until I tried the 15-shek falafel Yoni picked up for dinner one day. Our own foray into falafel making was somewhat lacking the first time (and first post!) but since chickpeas are one of those items that fall into the "you-can-get-a-lot-for-your-moneys-worth" foods we bought a kilo bag of dry ones awhile back. Recently though, we discovered a new use for chickpeas.... as a snack.


The recipe is simple. Soak the dry chickpeas in a large bowl of water overnight. The next day drain the water and pat the chickpeas dry. Pour a bit of olive oil in, just enough to coat it all. Add some salt. Spread it out on a baking sheet on top a cookie tray and bake at 230C/400F for about 40 minutes or until the chickpeas start turning a deeper shade of their natural color. Remove from the oven, pour back into the bowl and add additional seasoning as you'd like.

Who knew chickpeas could be so exciting?

chocolate mud pie with peanut butter cloud


Rachel and I are very proud of this dessert we made for Shabbat, and not just because it tasted great. People cook great tasting things all the time. But how often do they do so while improvising with leftovers? Or innovating new tastes, all while keeping things well within the limitations of a tight, underemployed budget?

This is what it's all about, dear SF2 readers.

Ok, now that I've got the drama out of my system, here's how it went down. Rachel crushed up some chocolate cookies we had left over from the previous Shabbat and mixed them with margarine to form a cookie crust. (See previous post.) She let that harden in the freezer, then prepared a chocolate pudding mix with soy milk for the filling.

Since we're really into the whole chocolate-peanut butter desserts, I tried to think of a way to incorporate peanut butter without relying on margarine. I settled on making a peanut butter whipped cream by first mixing a few large spoonfuls of peanut butter with parve whipped cream and a little soymilk to make a smooth and less viscous peanut butter base. Then I whipped the rest of the parve cream and folded in the peanut butter.

That parve creamer must have lots of emulsifiers in it, which worked out great for us and held the peanut foam together. A bunch of hours in the fridge helped it set nicely; not quite whipped cream texture, but definitely light, almost marshmallow like, and with the unmistakable kiss of peanut butter.

Gourmet? Definitely not. Fantawesomely delicious? Definitely yes.

Monday, July 11, 2011

Ragu for Two

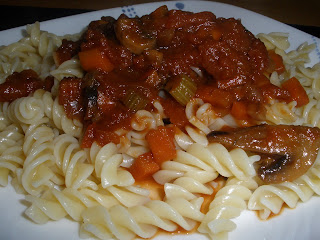
Seems like a ragu is usually a meat based sauce but here I left out the meat and even the veggie meat. (I'm reserving it for chili night... Stay tuned.) In any case the basic idea is to make a soffritto and simmer for a long time. (Impressive bit of knowledge I just shared, I know. In all honesty I got the name from Wikipedia and don't even know how to pronounce it. I'm not giving away any secrets here....) A soffritto is a mixture of chopped onion, celery, carrots, seasoning... etc. I also added some chopped garlic and mushrooms. For seasoning I used salt, pepper, oregano and thyme. Throw it all in the pot with some oil and let it go for awhile, until the vegetables have cooked down a lot. At this point I added in a bit of red wine (what was left in the fridge), 1 to 1 1/2 cups of water with chicken broth/soup mix, and a can of crushed tomatoes. Let that cook down a bit to get rid of some of the liquid and your ragu is ready. You can either serve it at this point (with pasta of course) or zuzh first then serve. I prefer the vegetable chunks (it gives my dinner some personality) but some prefer the smooth consistency. Either way your ragu will smell amazing and taste even better!

Sunday, July 10, 2011

Oh the things you can Roast

Now that we have our oven, the possibilities are endless. One of our favorite dinners (and only possible with an oven) is roasted vegetable sandwiches. So good and so healthy. The prep time on this is fairly short (cooking time is longer), basically just as long as it takes you to cut up your vegetables. I used:

Mushrooms
Zucchini
Eggplant
Tomatoes
Onions
Peppers

Although you can basically use any vegetables, I'd recommend using ones that are in season (that's the beauty of this sandwich). Slice up your vegetables - you want them to be sandwich stackable so slice them up relatively thin.


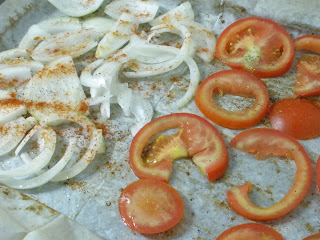
Lay them out on a cookie sheet, using a baking sheet. The more cookie sheets and oven racks you have the better but you can also do this in shifts, like I did. Lightly brush all your vegetables on both sides with oil. I seasoned some of the vegetables but most I let speak for themselves. Roast the vegetables at about 400F for 15-25 minutes each tray. Check on them after 15 minutes or so.


How amazing do these eggplants look?


Not only do grilled vegetables taste great, they also look great which is why I couldn't resist with the pictures. Not that these pictures do them any justice, you'll have to try this one out for yourselves.


When you've got all your vegetables roasted, sandwich them up and you're ready to go. We used pita this time but any bread will work. Extra flavoring or condiments is up to you but pretty unnecessary. These vegetables work well together. My favorites are the eggplants and tomatoes.


Grilled Nutella PB +++

Grilled nutella and peanut butter, and peanut butter and marshmallows. Enough said.

Thursday, July 7, 2011

Green eggs and... cheese. Sandwich.


Though I forget the context, I recently saw a dish of scrambled eggs cooked with spinach. The bitter-green taste of spinach nicely complements the seasoned, creamy eggs. I sweated some onions with garlic first, and then tossed in the spinach, which wilts almost immediately (so don't turn your back on it). Then I mixed in a couple eggs.

Spinach and eggs are tasty enough, but to make it a little more substantial I made sandwiches, each with a slice of cheese inside, and toasted them on the griddle.

Note: we have a new oven and stove. It's nice to finally graduate from using the woefully underpowered and pathetic GoldLine USA brand plug in burner set (subnote: if you see a piece of electronics in Israel with "USA" as part of its marketing, you can be sure it is a piece of garbage), but I haven't gotten used to the stove yet. It is electric ceramic, and while it's capable of a lot of heat, it can be hard to control that heat. Vegetables that are supposed to gently sautee instead emerge charred. Butter intended to melt instead hisses, browns, and burns within seconds, emitting fishy odors. So two of the sandwiches came out on the burnt side. And I'll figure out the stove eventually.

Easy Stuffing


This stuffing has a similar theme to the pie crust and the french toast (making something with "leftovers"). It sounds less appetizing than it really is. I should come up with another name for that. In the meantime, what do you do with (a lot) of "extra" chala? 1. Freeze it right away so it doesn't go bad. 2. Make stuffing.

Stuffing is delicious and requires only a few simple steps.

Ingredients:

Bread, lightly toasted, broken into small pieces (1/2-2/3 of a medium loaf)
2 cups of water with soup mix (my directions say 1 teaspoon mix per cup water)
12 oz. mushrooms
1 onion
3-4 cloves of garlic
2-3 celery stalks
1 medium sized carrot

The amounts are approximated but the idea is there. Saute all the vegetables together, making sure to dice the onions, celery, carrots and garlic pretty small. Add a bit of pepper. Add the soup mix water to the bread and stir so it's evenly distributed. Add the sauteed vegetables to the bread. Mix well. Pour into pyrex, aluminum tin, or corningware and bake at 350 F for approximately 40 minutes or until it starts to brown on top.

Wednesday, July 6, 2011

Beyond Stale Cookies

What do you do when the cookies you bought last week just aren't that fresh anymore? Well, you could eat them but let's face it, stale cookies just aren't worth it. So what do you do?

Make pie. Or pie crust that is.

Crush the cookies into crumbles, melt a bit of margarine or butter (try 1/4-1/2 cup), mix it together really well. Press into a pie shell and freeze until you're ready to make the pie.

Tuesday, July 5, 2011

Brown Rice and Mushroom Pancakes


    Brown rice can be pretty unexciting. For some reason we seem to have more of it than we really need. Since I'm not such a fan of rice in general, especially brown rice, I tried to find something interesting to do with it. This should have been a great recipe using some common, easy to find ingredients. Instead it took too much time and while it still tasted good, it wasn't really worth it. I've made some changes for those who are still interested. (It should work better now but I can't guarantee anything...)

    Olive oil
    5 cups thinly sliced mushrooms
    1 medium sized finely chopped onion
    1 finely chopped red bell pepper
    2-3 garlic cloves, minced
    1 tablespoon chopped thyme
    1 cup vegetable (or chicken) broth
    1 teaspoon cornstarch
    1 cup cooked brown rice
    4 tablespoons dry breadcrumbs
    2 large eggs, beaten
    Salt
    Pepper

    Sauce:
    Heat 2 teaspoons oil in a large nonstick skillet over medium heat. Add mushrooms, onion, and bell pepper; cook 10 minutes or until liquid evaporates, stirring occasionally. Add garlic; cook 1 minute. Stir in thyme, salt, and black pepper. Remove 1 cup mushroom mixture, and set aside. Increase heat to medium-high. Add broth and cornstarch to pan; bring to a boil. Cook 1 minute, stirring constantly. Keep warm.

    Pancakes:
    Combine reserved 1 cup mushroom mixture, brown rice, breadcrumbs, and eggs; mix well.Heat oil in a nonstick griddle or large nonstick skillet over medium-high heat. Spoon about 1/2 cup rice batter per pancake onto hot pan, spreading each to a 4-inch diameter. Cook 5 minutes on each side or until bottoms are golden brown. Serve with mushroom sauce.

    In the end I made a few "pancakes" but we just fried most of the remaining rice. For now, brown rice will have to remain unexciting.

    Perfect Brown Rice


    • As an afterthought (or really a before thought) I should explain how to cook the perfect brown rice, which you will need to do for the next recipe. Thanks to saveur.com for the innovation.

      Here's how you do it... Cook it like pasta.

      Rinse your rice with cold water in a strainer. Boil up a pot of water and when it's boiling, add the desired amount of rice. Let it boil for 30 minutes uncovered. Then pour the water and rice into a strainer. Return the rice to the pot and cover it, letting it sit for 10 minutes. Fluff and flavor.


            Monday, July 4, 2011

            French Toast for Two


            • ... A July 4th treat! (Plus we had leftover chala that needed to be eaten.) French toast is great because you probably always have the necessary ingredients around. While there are many variations, this is probably one of the simplest.

            • 2 eggs
            • 1/4 cup and 2 tablespoons milk
            • 1 tablespoon and 1-1/2 teaspoons brown sugar
            • 1/2 teaspoon ground nutmeg
            • 6 slices white bread (or any kind of bread)
            • 1-1/2 teaspoons ground cinnamon

            • -In a large mixing bowl, beat the eggs. Add the milk, brown sugar and nutmeg; stir well to combine.
            • -Soak bread slices in the egg mixture until saturated.
            • -Heat a lightly oiled griddle or frying pan over medium high heat. Brown slices on both sides, sprinkle with cinnamon, powdered sugar, or maple syrup (or in our case, date honey) and serve hot.

            Sunday, July 3, 2011

            Coleslaw (Ramen Noodles + Almonds)


            Great salad. Super easy.

            1/2 head of a medium cabbage
            2 medium sized carrots
            1 package of ramen noodles
            Slivered almonds

            Shred the cabbage and carrots in the food processor. Crush the ramen noodles. Add slivered almonds to the noodles (or if you only have whole almonds try heating them up in the microwave to make them softer and very carefully chop them up). Keep the noodles and almonds to the side until you're ready to serve the salad (they will get soggy).

            Then make this dressing:

            • 2 tbsp vegetable oil
            • 3 tbsp white wine vinegar
            • 2 tbsp white sugar
            • Seasoning packet from the ramen noodles
            • 1/2 tsp salt
            • 1/2 tsp ground black pepper

            Making do with Cottage Cheese


            This morning when I tried the cottage cheese for breakfast it didn't taste as delicious as it usually does. It wasn't as sweet and I could tell it had moved past its prime deliciousness. Since I still had quite a bit left, and didn't want to waste any (cottage cheese has become an expensive commodity around here), I looked for a recipe that would turn my sour-ing cottage cheese into a fantastic dinner. I found this sweet noodle kugel. Of course the description explains it as "old fashioned" - it's a KUGEL - and who hasn't had a kugel like this at least once in their life for a break-the-fast?

            The recipe is pretty straightforward with room to change it up a bit. For instance, I didn't have any sour cream or white cheese so I used all my cottage cheese and adjusted the other amounts accordingly. I left out the vanilla since we didn't have any and used bran flakes instead of corn flakes (another item I was looking to use up). I'm pretty sure you can't go wrong with cheese, eggs, sugar, and noodles. YUMM.

            Chahlizz

            After Yoni and I decided we were making aliyah we had to figure out which appliances we would take with us, which we'd leave and which we wanted to replace. The KitchenAid was at the top of the list to replace and take with us. We went to this tiny store somewhere near The Village that we knew sold 220V appliances. While we were paying for it the check out lady started making conversation, asking us where we were going... etc. At some point she turns to me and said, "so you gon make chahlizz?" I must have looked confused (either because I didn't understand the actual words that she was saying or because I was baffled by the concept) so she repeated herself a couple times. Finally I turned to Yoni with a look that said, "Do you understand her?" He said "Yea, she's asking if you're going to make chala". We both smiled at each other knowing the real truth behind who would be making the chahlizz in our house.... and yet, almost a year later here I am, making chahlizz.

            I promise to not get ahead of myself and start believing this will actually become a regular occurrence. But the fact that my very first time baking challot (yes, let's pronounce it so I can understand) was successful.... is very encouraging.

            Thanks to my sister for the recipe (originally found in the Beth Hamedrosh Cookbook) and for coaching me through the tough times.

            Here's the recipe I used:

            1 T salt
            1/2 cup sugar
            2 cup warm water
            2 packages yeast (each package is 2 and 1/4 tsp)
            2 eggs
            1/2 cup oil
            7-7 1/2 cups flour

            Combine all ingredients in order given. Knead, let it rise in oiled bowl for 1.5 hours. Punch down and let rise for another .5 hr. Shape and let rise another .5 hour. Bake at 400 F (204 C) for 20 minutes.