Thursday, March 15, 2012

Solet: Bread and Cake


Way back in the Winter of 2003-4, I was a student at Yeshivat Har Etzion. One of my fondest memories is eating hot bowls of "diysa" - basically cream of wheat - that the kitchen made out of leftover milk. That creamy porridge, made with full-fat 3% milk, was delicious.

Flash forward to the present day. After a long time I finally figured out that this porridge is made with סולת - a coarse semolina that you buy in the flour aisle, not the breakfast cereal aisle, which is why it took me so long to find it. I bought it in the only size available - a 1 kg bag. Turns out, though, making a large portion of diysa only requires like 1/3 a cup of solet. In other words, I had to find some other uses for the stuff.

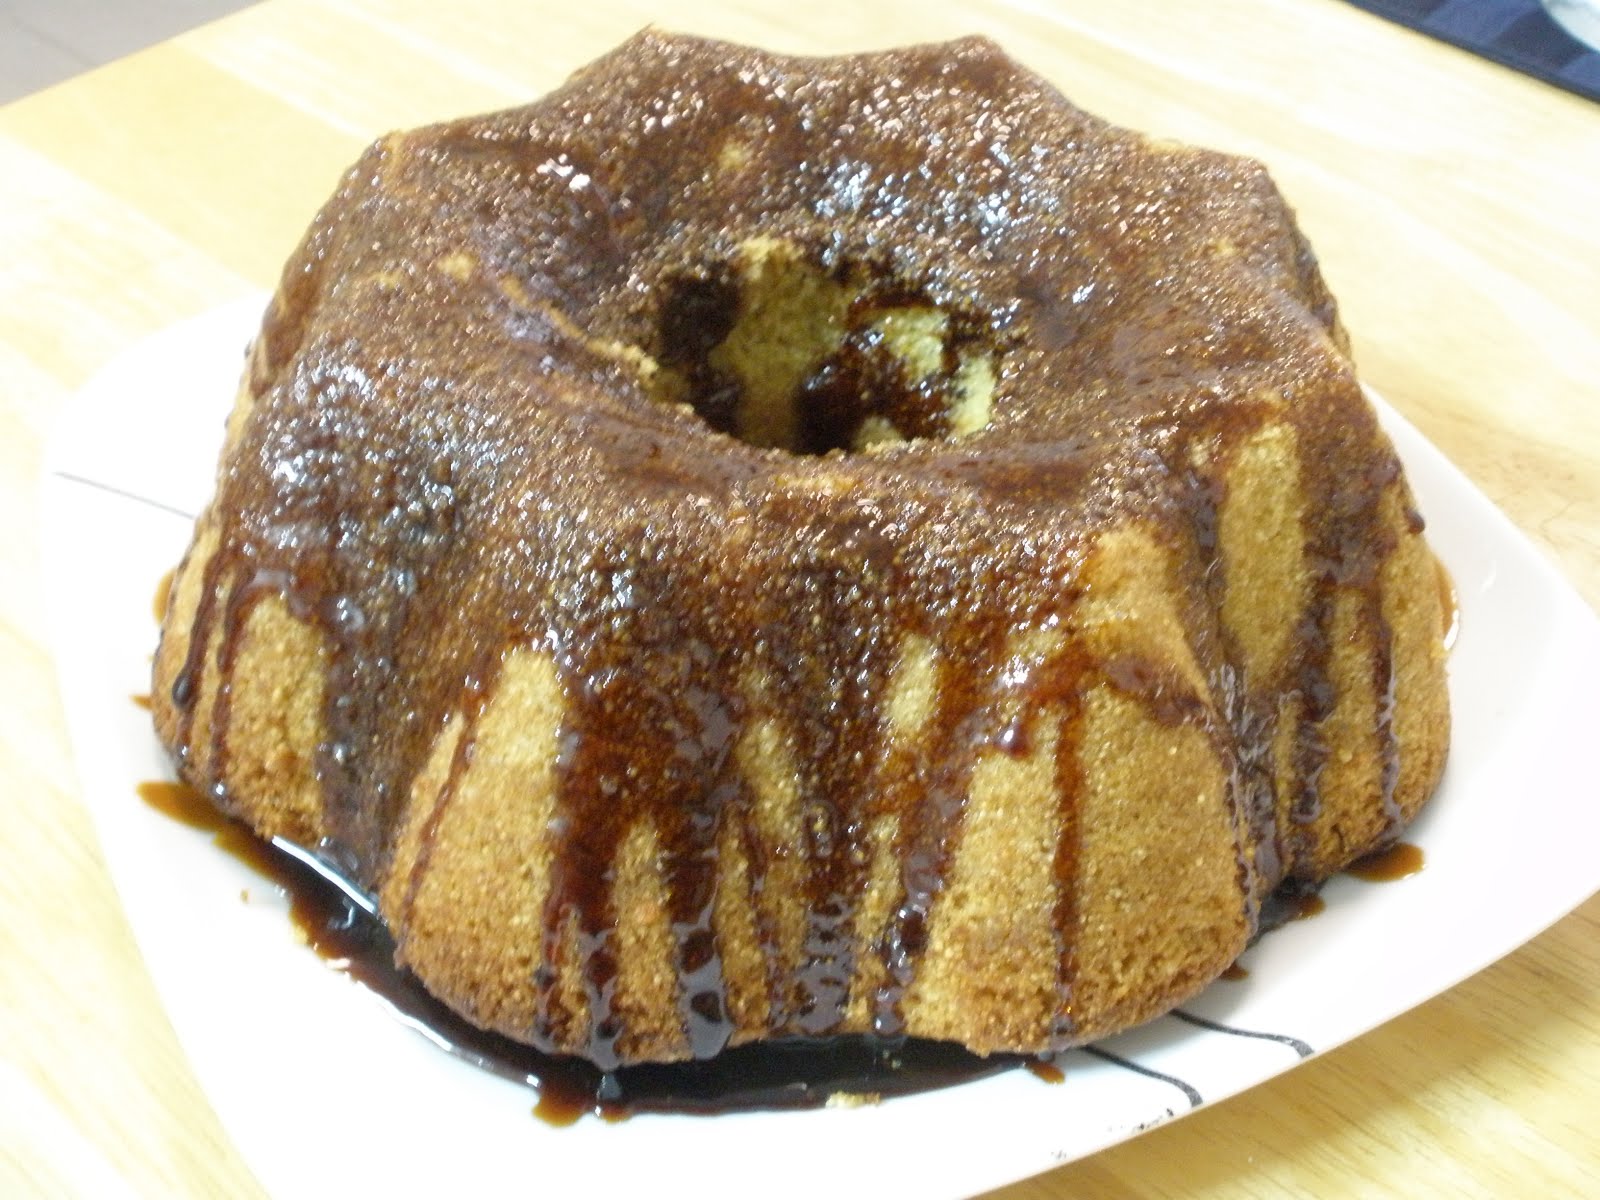
Enter solet bread and solet cake. In both cases, I made sure to google recipes in Hebrew, to avoid confusion with the fine milled semolina that people use for pasta making. Solet cake is a traditional Israeli dessert, and recipes abound. Solet bread is less common, but there were still a number of recipes I could choose from, based on which worked best with the ingredients I had around the house.

For the bread, I chose a sweet, enriched recipe. The dough included eggs and honey, and a mixture of solet and regular flour. It was a bad recipe; the final dough was excessively sticky and I had to add in a bunch more flour until it attained proper bread dough consistency. Oh, and I cut my flour with gluten, as I am wont to do when breadmaking.

Despite the bad recipe, the final product was very satisfying. The crust was toasty and crunchy, while the interior was soft, and slightly sweet. The bread lasted a while, making good sandwiches but even better toast. The sandwich pictured above is a spicy tuna sandwich - tuna salad mixed with hot sauce. Oh man. Make this sandwich...

I don't have the recipe for the cake but, again, they can easily be found online, and are all pretty much the same. The defining feature of a solet cake is the syrup that's poured over it after it comes out of the oven. Orange syrups are common, but we based ours on date syrup, giving dark, bittersweet caramel flavors to the cake. The cake itself is similar to a corn muffin - a dense, rich, crumbly texture.

Spinach pesto pasta


In our fridge, we had a relatively large quantity of spinach, and a smaller quantity of fresh basil. From these, the dish above was born. Fresh garlic, salt, pepper and olive oil were also involved.

I found this pasta a little bland. Good flavors all around, but just not enough oomph. I realize now that by not cooking the spinach, I gave up on those bitter and savory flavors one finds in sauteed spinach.

An improved version, then, would involve a) cooking the spinach first and b) more flavor - more basil, maybe some pine nuts, maybe some Parmesan

Oh, it's pretty though.

Wednesday, March 14, 2012

Coconut oil cookies


I'm always looking for innovative butter replacements. I'm pretty unsatisfied with margarine, or at least the hard, tasteless cheap margarine I buy at Supersol. Sure there are softer, tastier (and more expensive) margarines on the shelf, but I haven't experimented much with them because a) they are more expensive than regular margarine and b) they probably contain emulsifiers and other polymeric stabilizers which I HAVE NO PROBLEM WITH PHILOSOPHICALLY but might mess up my cookie dough.

Anyway I subscribe to a blog that's all about parve desserts, and here is a link to it: http://www.couldntbeparve.com/ The blog reminded me about coconut oil, which I had been thinking about some time already. It is solid at room temperature and is supposed to have a buttery taste.

Here's where I'd normally go off on a tangent about solid fats for baking and shortening and trans fats and how now they make shortening with no trans fats and how you can't get shortening here except maybe in Jerusalem, Efrat or Ramat Beit Shemesh. But I won't.

I'd seen coconut oil before in the organic food store, but never bought it because it's super expensive. But I decided to take the plunge and buy a small jar after seeing a recipe on the aforementioned blog for sugar cookies using coconut oil (I'll leave you to search for the recipe if you want).

Another reason I wanted coconut oil was because I read online that if you make popcorn in coconut oil it tastes like movie theater popcorn, because that's what movie theaters pop their popcorn in.

Lastly, I had a sneaking suspicion that coconut oil was a secret ingredient that imbued certain baked goods with delicious flavor, namely Green's babka and Marzipan's rugelach.

Our verdict on the cookies - good, not great. We wanted crispy sugar cookies but we rolled the dough a little thick, so they came out soft. We tried putting them back in the oven but that just made them sort of hard/burnt.

I could taste the flavor of the coconut oil, and it was an improvement over margarine, but it wasn't as good as a butter cookie. But it was only a first experiment, and I have ideas for more. For example, I have a knockout hamantaschen dough recipe that includes orange juice and zest, the acidity of which makes the cookies irresistible. I think a coconut oil sugar cookie with orange zest may make waves...

We've made at least 3 batches of coconut oil popcorn. It's good, but there's no noticeable movie theater taste. I'd have to try it side by side with popcorn cooked in canola oil or something. Plus, I still haven't perfected my popcorn technique - the stovetop pot method still comes out a tad soggy...

Monday, March 12, 2012

Noodle Soup


Let's talk about miso for a second:

Pros: Tastes delicious, lasts forever in the fridge, good for soups

Cons: You never actually finish it, and begin to wonder if it's chametz when Pesach rolls around

We have a container of miso in our fridge from lord knows when. It gets used here and there but my favorite application is for miso/noodle soup.

Disclaimer - I don't know anything about authentic soups of this nature. I've never had a "real" bowl of ramen. The soup we ate tonight was definitely inauthentic in every way. But it was easy and delicious.

Here's how I made it: I sauteed some miso in vegetable oil and added garlic powder, red chili flakes and celery salt (I've started putting celery salt in everything these days). Stir that up a bit, add boiling water and soup mix. Try to get soup mix with MSG if you can find it. Season with a little vinegar. Taste the broth and continue to season (maybe a little more salt, maybe a little more vinegar, maybe some sweet, maybe some spicy...) until it's to your liking.

Here's where things get awesome: you can add pretty much whatever you want. Ideally, you should make this soup when you have random leftovers in your fridge. You can add meat if you want. You can add vegetables. Ramen noodles work. Egg noodles work. Leftover spaghetti would work and I bet you could even cook raw pasta in this broth although I've never tried it.

What did I do? First of all, we had a big head of lettuce whose outer leaves had wilted. Don't throw out wilted lettuce! It's no good for salad, but it's perfectly good for cooked greens. I cleaned mine and then trimmed out the tough stem and them sauteed them in olive oil and garlic. I did this last night, saved them, and added them to the soup today.

We also had some shaved carrot (that's a carrot that's been shaved into noodle-like shapes) in a bag. Into the pot it went, as did a package of egg noodles. We actually buy those specifically for soup.

Lastly, I poached two eggs in the boiling broth to add some protein and richness.

People, this soup was really good. Totally inauthentic - the broth was instant soup mix rather than long-simmered chicken or beef broth. The noodles were egg noodles, not ramen noodles. It contained no pork because swineflesh is unclean and forbidden. But seriously, who cares. It's amazing and filling. You can make yours even healthier by adding more veggies and maybe throwing in some tofu instead of the egg.

Make this soup!


Wednesday, February 1, 2012

Cornbread Muffins

What do you do when you have A LOT of cornmeal?

Make corn muffins!


I'm pretty sure this is the recipe I used with a couple changeups.  Stay tuned for more cornbread recipes...

1 cup yellow cornmeal
1 cup all-purpose flour
1 tablespoon baking powder
1/2 cup granulated sugar
1 teaspoon salt
1 cup skim milk
2 large eggs
1/3 cup vegetable or canola oil
1/4 cup date honey

Preheat oven to 400 degrees F/200 C.
Into a large bowl, mix the cornmeal, flour, baking powder, sugar, and salt. In another bowl, whisk together the whole milk, eggs, butter, and honey. Add the wet to the dry ingredients and stir until just mixed.
Place muffin paper liners in a 12-cup muffin tin. Evenly divide the cornbread mixture into the papers. Bake for 15 minutes, until golden.

Cranberry Applesauce Muffins

Admittedly I don't have much to say about muffins. It's a good thing to grab for breakfast when you've run out of homemade bagels (post to come) or granola OR it's not Friday morning so you don't have time for french toast. I thought that if I used applesauce they would be health(ier) muffins but that's debatable. I used this recipe from yummly.com. If I made them again I would cut down on the flour so maybe they wouldn't be as dense. (The batter was almost dough like in consistency.) But I'm not a food scientist...

1 cup unsweetened applesauce
1/3 cup vegetable oil
1 beaten eggs
2 cups all-purpose flour (purpose)
1/2 cup white sugar
1 tsp baking soda
1 tsp ground cinnamon
1/2 tsp salt
1 cup cranberries (fresh or frozen, chopped)
1/2 cup chopped pecans

1. Preheat oven to 350 degrees F (175 degrees C). Grease and flour a muffin pan, or use paper liners.
2. In a small bowl, mix together applesauce, oil and egg. In a large bowl, combine flour, sugar, baking soda, cinnamon and salt. Make a well in the center, and pour in egg mixture. Stir until just moistened. Fold in cranberries and pecans. Spoon into muffin cups, 2/3 full.
3. Bake in the preheated oven for 25 to 30 minutes, or until a toothpick inserted into the center comes out clean. Cool in pan for 2 minutes before removing.

(Apologies for the lack of a picture - you'll have to try it yourself to see what they look like!)

Sunday, December 4, 2011

The Turducken Post


Thursday, Nov 24, 7:30 PM

I am ready to begin. All three birds are sitting in the fridge - a frozen duck that's been thawing for the last few days, a turkey that took two visits to Supersol to get, and a chicken. I'm slightly concerned, because the duck is supposed to be larger than the chicken, but Israeli chickens are significantly larger than American chickens, and it looks like the opposite is true for ducks. More on that later.

My team arrives - Akiva, Ari and Levi. Ari brings bags full of produce and gear - thermometers, knives, latex gloves, a blowtorch. He probably has a nuclear reactor in that bag somewhere, just in case. I put Levi to work doing stuffing prep - lots of vegetable dicing and manning the stove. Ari, Akiva and I each take a bird, a cutting board and a knife. Akiva has been methodically honing his knife for the last 30 minutes with an intense look on his face - I am scared but also excited. We're going to be de-boning on the plastic folding table, which has been covered with a plastic table cloth. In Rachel's words, "at least the plastic table can be Chloroxed down after".

There are some dishes in the sink with my name on them, but Rachel takes pity on me and cleans them. Then she retires to the guest room and closes the door, so that she will not have to watch poultry being deboned.

8 PM

We have made our incisions. Ari and I have made very little progress, despite having watched numerous Youtube vidoes in preparation. Akiva, meanwhile, has deftly deboned half of his duck. I jealously accuse him of hustling us, but he insists this is his first time. Levi mows through vast quantities of onions, celery and green bell pepper.

9 PM

The deboning is finished, much earlier than expected. Deboning is not super easy, but it's not as hard as I thought it'd be, especially with two helpers. We all turn to the stove to help Levi turn out three stuffings - cornbread gizzard stuffing, sausage stuffing, and mushroom stuffing.

10 PM

With the stuffings all made, we begin to assemble. It's like a bizarre operating table with three gloved (of course.. don't worry) men holding, tugging and stuffing fowl as tightly as possible, crudely weaving the seams together with wooden skewers. I'd say next time I'll use butcher twine, but there isn't going to be a next time.

I was right, and the duck is about the same size as the chicken. Still, we stick to protocol and we do our best to wrap it around. It's kind of a mess, but we're wearing gloves and there's plastic protecting the table, so it's all good. We try to stuff the duck inside the turkey, but it looks like it won't fit. We'll make it fit, I say, and we begin to tug at the turkey skin. Turkey skin, we discover, is slightly elastic, and stretching does the trick. My friends hold the seam in place, and I weave (more like ram) skewers through it. We don't do a very neat job, but the skewers will come out in the end, anyway. We hoist the bird into the roasting pan. It looks like a fat man in an undersized bathtub. The whole thing is crazy heavy - must be at least 40 pounds. We celebrate, and Rachel snaps some photos.

12 AM

The mess wasn't that bad, but it still took a while to clean, even with very generous and undeserved help from Rachel. I sit down and eat my snack - leftover gizzards that I floured and fried until crispy. The gizzards are extremely salty, but fried in flour with hot sauce on top, the saltiness is tolerable and almost decadent. They are a little tough, though. According to the Internet, I'd have gotten better results if I'd boiled them first for about 15 minutes - this would have made them softer and also leached out a bit of that salt. I'll probably make them again some time; being the cheapest part of the chicken, gizzards make an affordable snack. You can often buy a kilo for under 10 shek.

Friday

7 AM

Ahh! My alarm was supposed to wake me up an hour ago! I hurry out of bed and wash up quickly. I plunge the meat thermometer into the turducken - it's a very neat thermometer that simultaneously measures the internal temperature of the meat as well as the oven temperature. A quick google conversion tells me that 225 F is equal to 107 C. I turn the oven to about 125 C just to be safe, and turn on the convection fan to distribute the heat more evenly.

Meanwhile, I take a stockpot out of the fridge. Inside are all the bones from last night, roasted for about an hour in the oven. I pour water over them and start making the greatest poultry stock ever.

7:30 AM

Oops, I forgot to do a spice rub! I take the turducken out, and rub it with some spices (gloved hands, again), then put it back.

8 AM

I am pleased with my temperature control. The oven is maintaining a consist temperature hovering just above 225 deg F. According to the Internet, this temperature will cook my turducken in 8 to 9 hours, bringing it to completion before shabbat. Jeffrey Steingarten needed over 12 hours to make his, but he was cooking at 190 deg F, significantly cooler. I should be fine.

10:15 AM

The temperature has been holding steady, but I still don't see any juices in the pan. Turduckens are supposed to exude enormous volumes of beautiful golden liquid, and it's important to periodically remove it. You don't want your turducken to stew instead of roast, and, in my case, I don't want the liquid to flood and spill out of the pan and start a fire. I have a turkey baster at the ready, but there's only the slightest bit of juice at the bottom! Am I doing something wrong? Maybe the juice will come later?

11:30 AM

It's been over four hours, which means I'm supposed to brush oil over the turducken, and then cover it with foil. The internal temperature has risen to 130 F. I take it out of the oven and - behold! - some juice has indeed collected in the pan. Nothing like the opaque swimming pool of yellowness that I was expecting, but lots of golden, savory gravy. I collect it eagerly, get the birds oiled and foiled, and return the behemoth to its slow, steamy cell.

1:30 PM

150 F! This bird is actually going to cook!

3 PM

165 F! Just as our guests walk through the door, I triumphantly hoist the finished 'ducken and set it down to rest. It is golden and beautiful.

4 PM

We put the turducken on the plata

6:30 PM

After kiddush and motzi, I immediately begin carving the turducken, while Rachel tends to the salads and whatnot. I find that it is completely impossible to cut neat, whole slices containing clearly visible layers of meat and stuffing. I mostly blame the duck, which, in its central location, is supposed to lend structural support to the finished product - ours does not, because it is a small duck, and therefore we can't have neat slices. Maybe no one who makes turducken ever gets neat slices. In any event, I decide to simply cut up the turducken and pile it, casserole-like, on large serving platters. Our guests poke around the platters, taking what they wanted, and sometimes requesting certain parts (usually duck). We pass around two bowls of gravy, and I wonder what we were going to do with the other gallon of gravy I have sitting on the counter. And then we taste.

It was all worth it, folks. Don't listen to those who say turducken is no greater than the sum of its parts, they are wrong. All of the birds are cooked wonderfully - juicy and not at all dry. This is an obvious consequence of their low, slow cooking. The stuffings lost their individual distinction, but blended into one that was mouth-wateringly rich, full of salt and juices, sweet grainy cornbread, pungent herbs and savory aromatic vegetables. It is messy, but it packs a wallop of comfort-food-Thansgiving FLAVOR!

And I'm never doing it again.